

Demo Strategy
March 12, 2026
How to Structure a Presales Demo (That Actually Moves the Deal Forward)
A proven structure for presales demos that align to buyer problems, handle objections, and drive clear next steps.
Software demo structure
Quick answer: A software demo should follow a 5-step structure — agenda, overview, demo, proof, and next steps — to guide the buyer toward a decision. A software demo structure is the sequence used to guide a buyer from understanding a problem to making a decision.
If you need a simple version, use this 5-step structure:
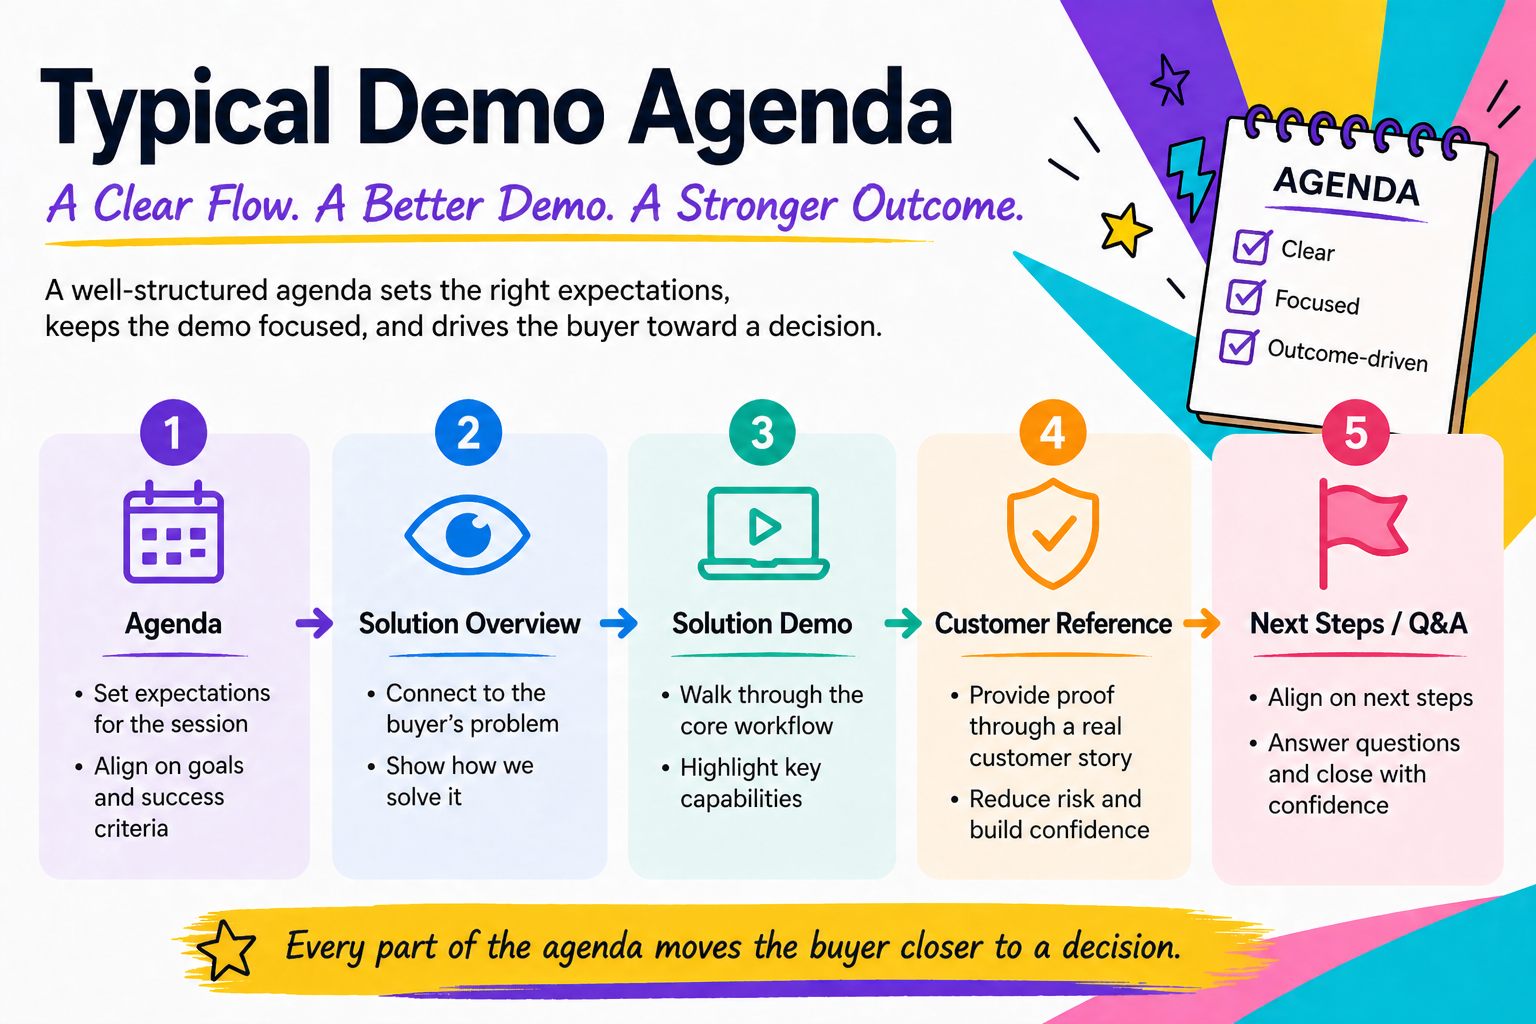
- Agenda — set expectations and align the session
- Solution overview — connect to the buyer’s problem
- Solution demo — show the core workflow
- Customer reference — provide proof and reduce risk
- Next steps / Q&A — drive a clear decision
This is the standard structure used in most product demos.
Why this structure is not enough
Most teams already follow this flow.
But deals still stall.
Because structure alone doesn’t drive decisions.
That’s where the Decision-Driven Demo Framework comes in.
How to Structure a Presales Demo That Drives Decisions (Not Just Features)
In one line: A presales demo is a structured conversation designed to help the buyer make a decision — not a walkthrough of features.
Let’s be clear.
A lot of presales demos don’t fail because the product was weak. Or because they didn't see enough of the product.
They fail because nothing in the demo is tied to a decision.
When you showed them features, the audience nodded and then you wrapped the call.
And then… crickets!
A strong presales demo is not a walkthrough or a tour of features. It is a decision engine.
Every section should help the buyer answer one question:
Can we confidently move forward?
What is a presales demo structure?
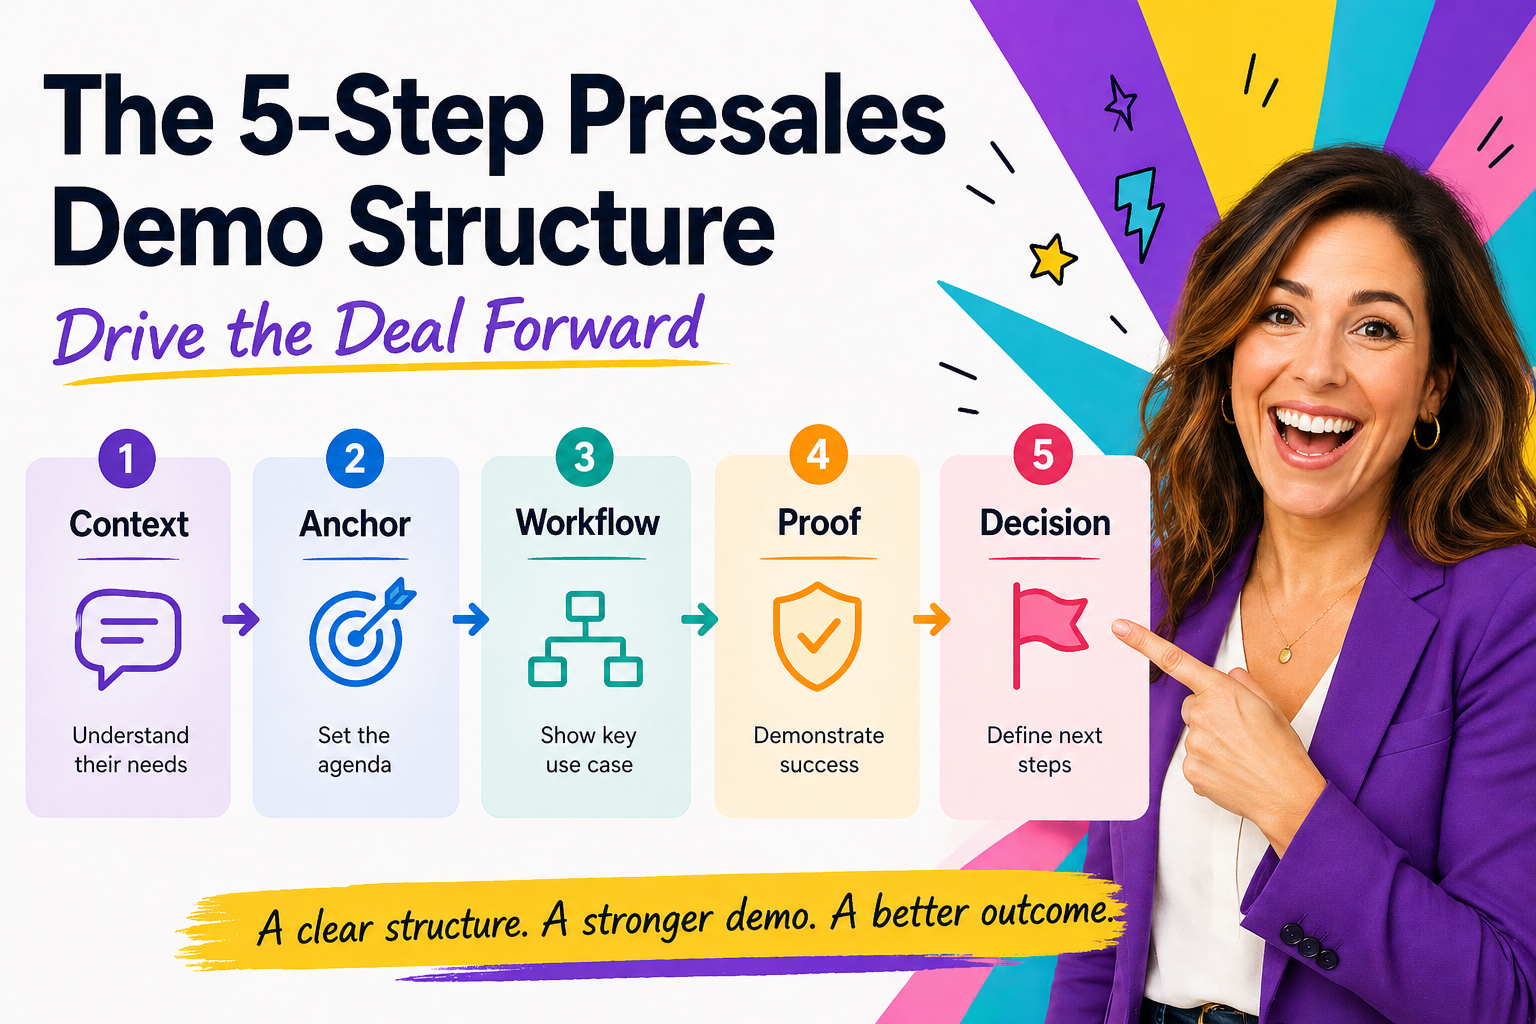
A presales demo structure is the sequence you use to move a buyer from problem awareness to decision confidence.
A strong presales demo has five parts:
- Context — show that you understand the buyer’s world
- Anchor — set the path before showing the product
- Core workflow — demonstrate the most relevant use case
- Proof — reduce risk and build confidence
- Decision layer — guide the buyer toward a clear next step
If one of these parts is missing, the demo usually becomes a feature tour.
And feature tours rarely move deals forward.
The simple rule
A demo should not show everything the product can do.
It should show the few things the buyer needs to believe before they can make a decision.
Most demos fail before the product is even shown.
They fail because the presenter starts with screens instead of context.
How Decisions Actually Get Made in Real Life
Meet the Buyer
A couple in their late 30s. Three kids. Currently living in a cramped apartment.

Mornings are super chaotic. No space. No storage. No separation between work, school, and life.
They’ve got zero time to browse homes for fun.
They need to move.
What They’re Actually Deciding
They inspect 10+ houses over a few weeks.
Every home looks “nice.”
Modern kitchens. Fresh paint. Good lighting.
But none of that is the real decision.
In their head, they’re running a much sharper filter:
- Will this house actually reduce the daily chaos?
- Can we afford this without stress creeping in every month?
- Is this the place we can commit to for the next 10 years?
That’s it.
Not features.
Not aesthetics.
Resolution.
Where Most Sellers Get It Wrong

If the real estate agent just says:
This home has a renovated kitchen, open-plan living, and great natural light…
The family nods.
It all sounds good.
But nothing moves.
Because the real questions are still unanswered.
What Moves the Decision
Now imagine a different approach:
You mentioned mornings are hectic with three kids.
This layout gives each child their own space — and keeps the kitchen central so you’re not managing chaos across rooms.
On affordability — at this price range, you’re within your current budget buffer. You’re not stretching into risk.
And this suburb — families like yours typically stay here long-term. You’re not moving again in 2–3 years.
Now something changes.
They’re not just seeing a house.
They’re seeing a decision come together.
What This Means for Your Demo
Your buyer is that family.
They are not evaluating features.
They are trying to resolve pressure:
- Will this fix the problem we’re dealing with right now?
- Is this a safe decision financially and operationally?
- Can we commit to this without regret?
If your demo only shows “what the product does” —
you’re the agent talking about kitchen finishes.
And the deal stalls.
Most demo mistakes are predictable. Run the checklist before your next customer call.
Generate my checklistBecause the decision never formed.
If your demos tend to turn into long product tours, read Stop Feature Dumping: Why Your Demo Is Losing the Room.
What “structure” really means in a presales demo
Structure is not about order.
It is about alignment.
- Alignment to the buyer’s problem
- Alignment to stakeholders in the room
- Alignment to the decision they need to make
If your structure is unclear, the buyer has to do the work of connecting the dots.
And they won’t.
The 5-part structure of a high-impact presales demo
1. Context (2–3 minutes)
Start with their world — not your product.
- What are they trying to achieve?
- Where is the friction?
- What is the impact?
Say it back to them:
You mentioned reporting delays are slowing decision-making. We’ll focus on how to fix that.
This does two things:
- builds credibility
- creates a filter for everything that follows
2. Anchor (set expectations)
Before you click anything, set the path.
We’ll cover one workflow that solves this, show how it works at scale, and then talk next steps.
Now the audience knows:
- where they are
- what matters
- when to engage
Without this, demos feel like wandering.
3. Core workflow (the demo itself)
This is where most demos go wrong.
Instead of showing everything, focus on:
- 1–2 key workflows
- tied directly to their use case
Every click must answer:
Why does this matter to them?
If it doesn’t — skip it.
4. Proof layer (reduce risk)
At this point, buyers are thinking:
Will this actually work for us?
So you show:
- data scale
- edge cases
- real-world usage
- integrations
This is where trust is either built or lost.
5. Decision layer (this is where deals move)
Most demos skip this entirely.
You must address:
- implementation effort
- timeline
- risks
- next steps
Then close with a recommendation:
Based on this, the next step is a working session with your team to validate this workflow.
If your demo doesn’t lead to a decision, it’s just a tour.
Get better at demos
Practical ideas, teardown lessons, and tools for people who present software.
Get the ChecklistHow this maps to a real demo session
In practice, most demo sessions follow a familiar flow:
- Agenda
- Solution overview
- Solution demo
- Customer reference
- Next steps and Q&A
That is not wrong.
But on its own, it does not guarantee a strong demo.
What matters is how that flow maps to decision-making.
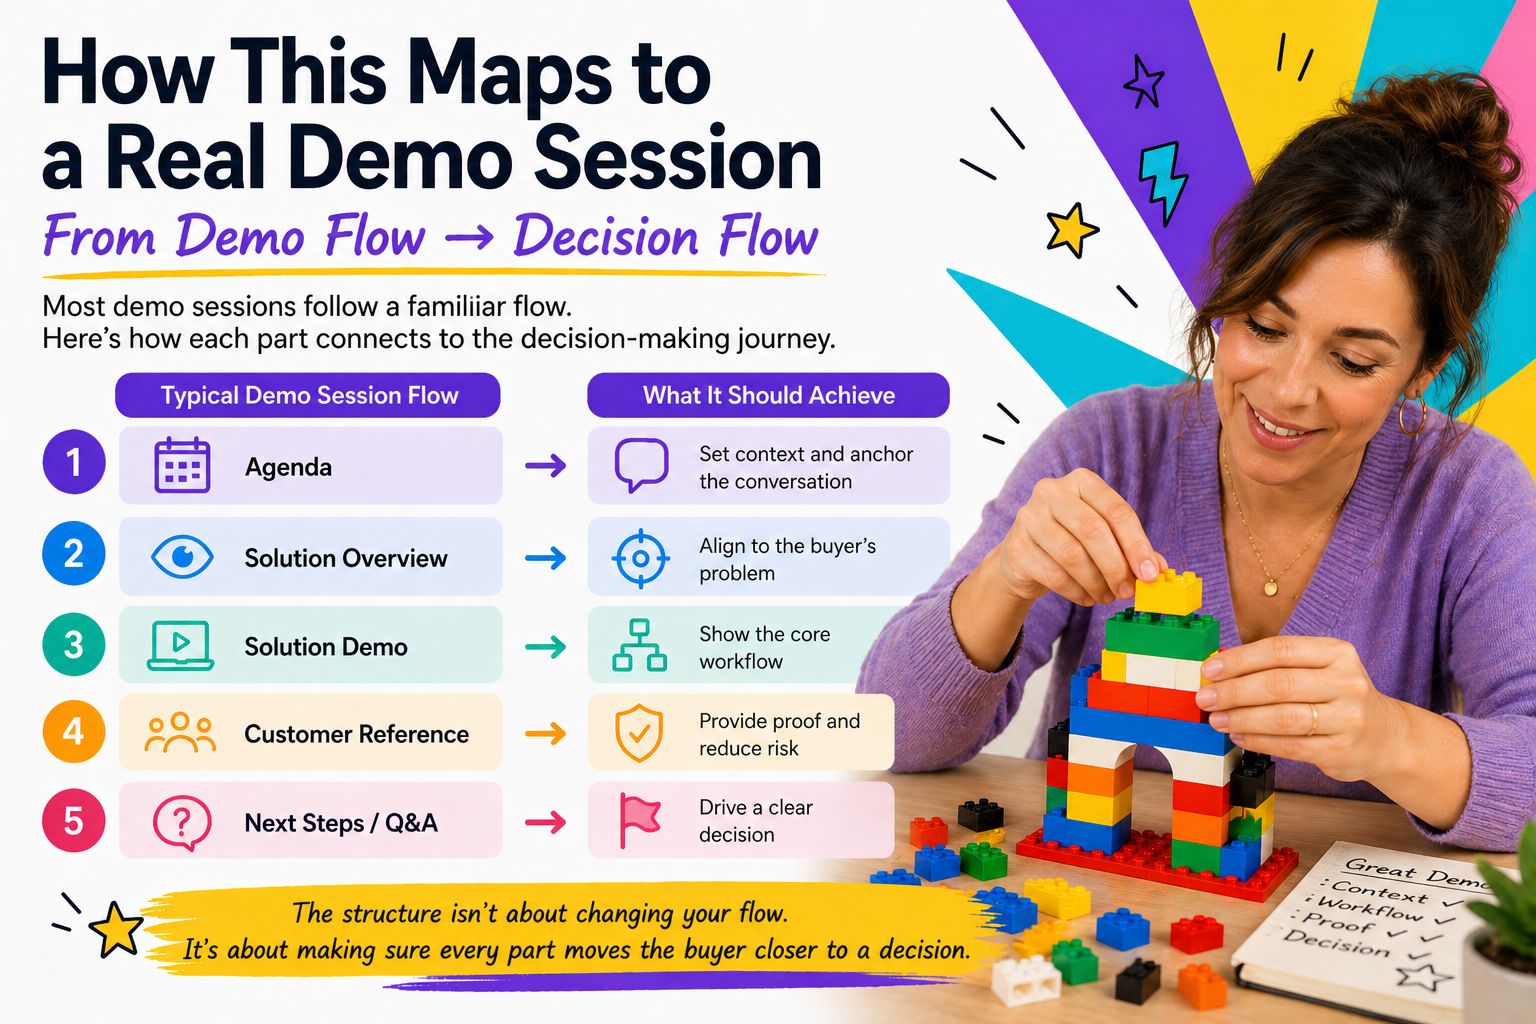
A real demo isn’t about following steps — it’s about making each step move the buyer closer to a decision.
Here’s the connection:
How demo flow maps to decision flow
- Agenda → Set context and anchor the conversation
- Solution overview → Align to the buyer’s problem
- Solution demo → Show the core workflow
- Customer reference → Provide proof and reduce risk
- Next steps / Q&A → Drive a clear decision
The structure is not about changing your flow.
It is about making sure every part of your flow moves the buyer closer to a decision.
Map your demo to discovery (this is where most teams fail)
Your demo should not be generic.
It should be mapped directly to what you learned in discovery.
Think of it like this:
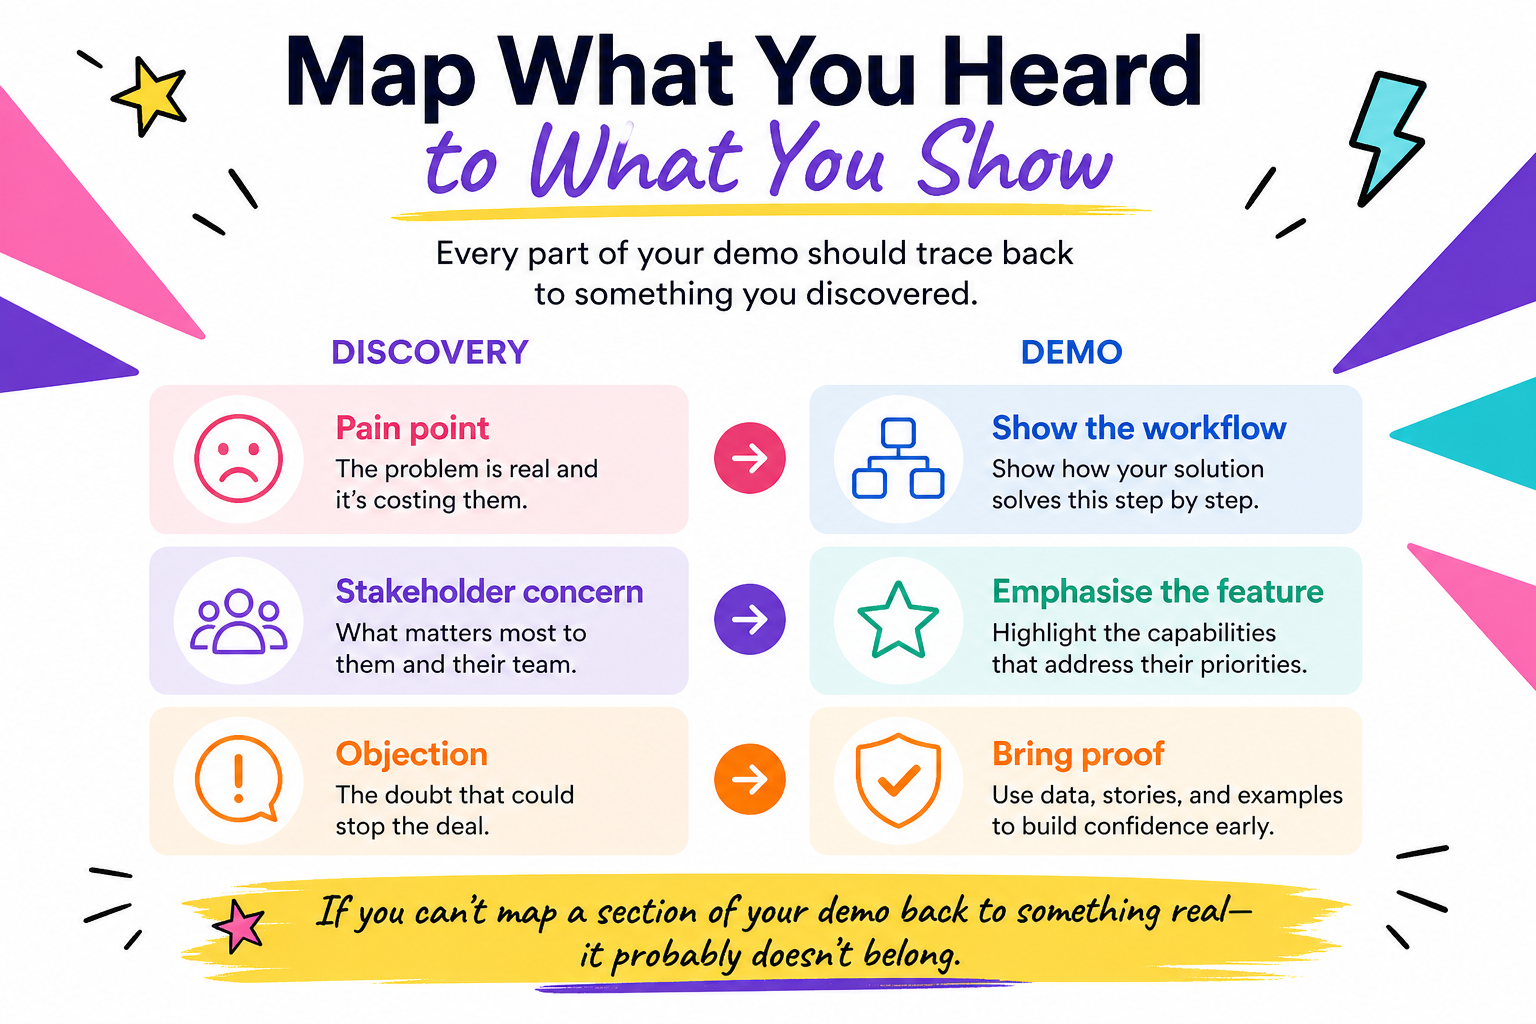
Example:
- Pain: “Manual approvals slow things down”
- Demo: Show automated workflow
- Objection: “Will it scale?”
- Proof: Show high-volume scenario
This is what separates average demos from high-converting ones.
Real-world example
You are demoing a procurement tool to a finance and operations team.
Weak structure:
- Start with dashboard
- Jump across features
- Take questions randomly
- End with “any questions?”
The result: confusion and no clear next step.
Strong structure:
Start with:
You mentioned approvals are slowing down purchasing. We’ll show how to streamline that.
Then:
- show one approval workflow
- demonstrate exception handling
- show reporting
End with:
Next step: let’s validate this with your real data in a working session.
Now the demo moves the deal.
Common mistakes when structuring a presales demo
- Starting with product instead of context
- Trying to show everything
- Skipping the agenda
- Not linking features to outcomes
- Ignoring objections until the end
- Ending without a recommendation
For more on delivery mistakes, read
Common Demo Mistakes That Kill Trust.
Why demos lose attention
Too many paths in one call. No clear demo structure for questions to snap back to. Weak transitions, so nobody knows which chapter you are in. When the demo flow stops making sense, buyers go quiet—they are not rude; they are lost.
Pro tips (the secret sauce)
Structure is invisible when done right.
The audience should feel clarity, not notice your framework.
Cut harder than feels comfortable.
Less shown = more understood.
Repeat the problem.
Reinforce it throughout the demo to maintain relevance.
Design for decision, not applause.
A “great demo” that doesn’t move the deal is a failure.
Quick Answer: The Structure That Actually Moves Deals
A presales demo only works if it helps the buyer make a decision.
Use this structure:
- Context — prove you understand their problem
- Anchor — show them what matters in this demo
- Core workflow — demonstrate the exact use case
- Proof — remove risk and doubt
- Decision layer — guide the next step
If your demo skips context or ends without a recommendation, the deal usually stalls.
Explore each part of the demo
The map above is the full demo structure for presales. When you want to zoom in on one slice of the demo flow, use these:
- Demo structure hub (5-step framework) — five beats on a sticky note; your quickest cheat sheet.
- Demo flow example (from start to finish) — one structured demo on a real clock, line by line.
- How to start a demo so people pay attention — the first two or three minutes, done right.
- How to transition between sections in a demo — phrases and habits between beats.
- How to end a demo without losing momentum — recap, next step, no weak finish.
- Asking for the sale after a demo — when they liked the call but ghosted after the proposal.
Learn more and apply this
To tighten your delivery, read
Common Demo Mistakes That Kill Trust
To avoid overloading your audience, see
Stop Feature Dumping: Why Your Demo Is Losing the Room
If you want a structured way to apply this, use our
Demo Checklist Generator
Your demo isn’t converting.Get a Demo Audit.
We’ll review your live demo or product video and show you exactly what’s losing your audience — and how to fix it.
Built for real demos, not generic advice.
Pinpoint the problems
We find the exact moments where your demo loses momentum.
Get specific fixes
Clear, practical recommendations you can apply right away.
Drive more yes
A better demo experience that leads to more conversions.
Tags
Want to run better demos?
Get practical frameworks and tools used by presales teams.
Get the ChecklistContinue learning:
Related Articles
Demo Strategy • March 29, 2026
Demo Flow Example (From Start to Finish)
Demo flow example: walk a real software demo from hello to next step—then steal three flow patterns, Tell–Show–Tell beats, and a fill-in outline for your next presales call.
Demo Strategy • March 29, 2026
Demo Structure: Simple 5-Step Framework
A simple, repeatable structure for running clear, focused demos—plus links to go deeper when you need it.
Demo Strategy • March 29, 2026
How to End a Demo Without Losing Momentum
Finish your demo strong: show why it matters, repeat the key messages you started with, and be clear on what happens next — don’t just stop and ask 'any questions?'